Game of Active Directory (GOAD)
Huge shout out to @M4yFly for all the hard work to create GOAD!
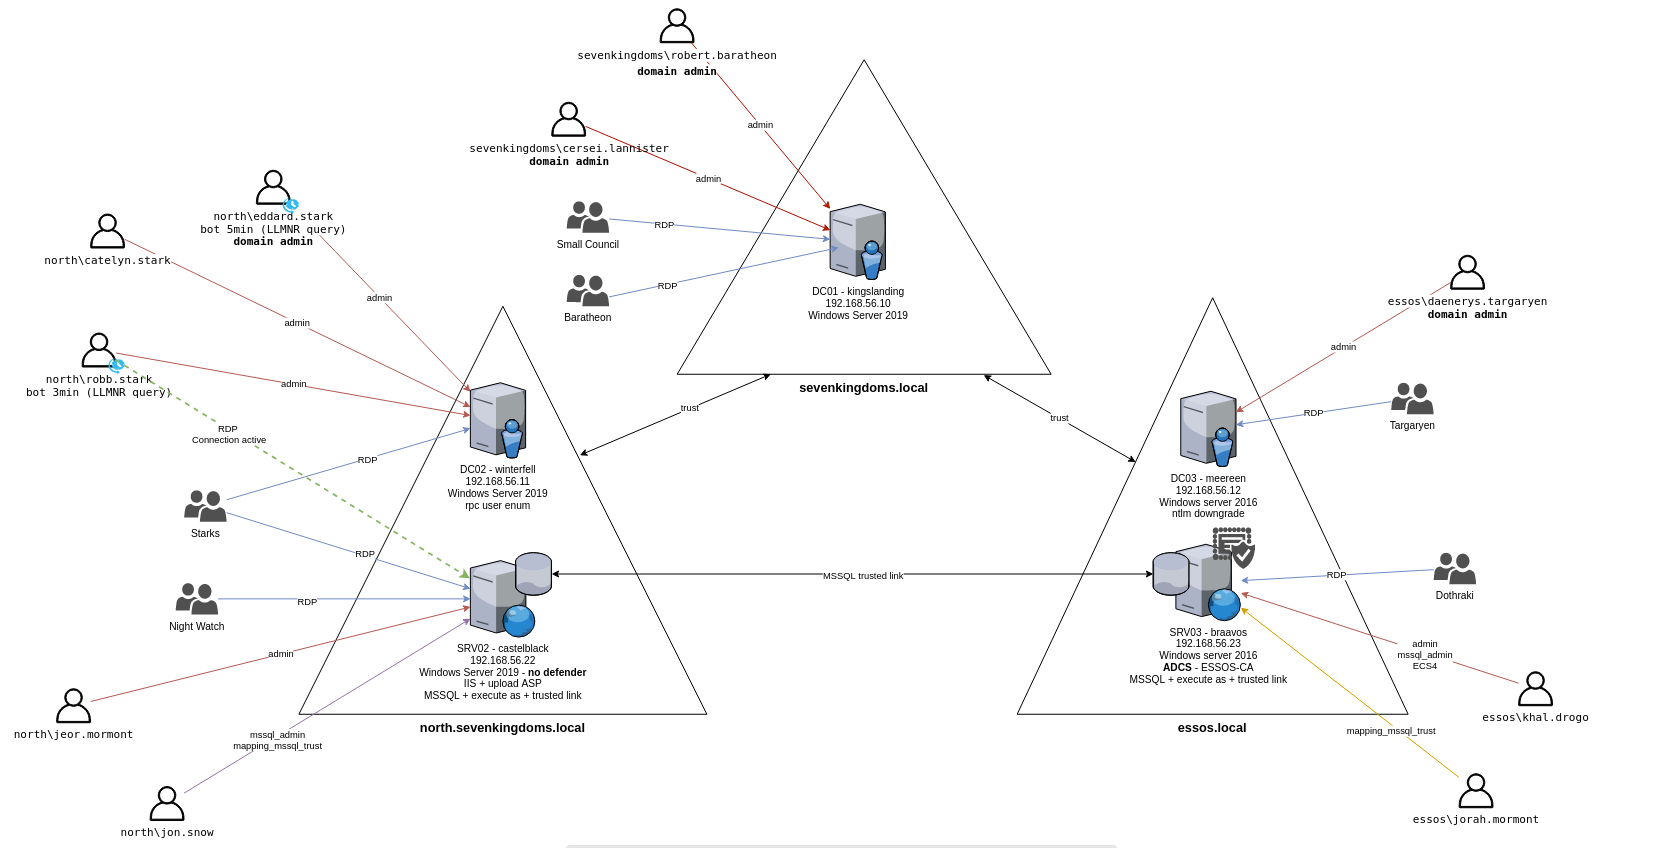
1. Use the Ludus-native GOAD blueprint
ludus source add ludus-source-bsl
Ludus Source - Bad Sector Labs
Production-ready Ludus blueprints (GOAD multi-domain AD attack lab and AD + Elastic Security detection labs) plus the Packer templates they
build on.
Synced 2h ago

  Blueprints 1/3 │ Templates 0/21 │ Ansible 0/13

  [ ] AD + Elastic Security Range                                  v0.1.0             ○ not installed
  [ ] Clean AD + Elastic Baseline                                  v0.1.0             ○ not installed
> [x] Game of Active Directory (GOAD)                              v1.1.35            ○ not installed
      Multi-forest AD attack lab based on GOAD.
ludus range create -r GOAD --name GOAD --from-blueprint ludus-source-bsl/goad
ludus range deploy -r GOAD
ludus range logs -f -r GOAD
# Wait for the deploy to finish
2. Snapshot VMs
Take snapshots via the proxmox web UI or SSH run the following ludus command:
ludus -r GOAD snapshot create clean-setup -d "Clean GOAD setup after ansible run"
3. Hack!
Grab a fresh wireguard config with ludus user wireguard and connect.
With your WireGuard connected on a client machine (your laptop, etc.), access your Kali machine at https://10.RANGENUMBER.10.99:8444 using the creds kali:password. Or you can access the lab directly from your client machine with WireGuard connected and attack the 10.RANGENUMBER.10.X subnet.
Follow the GOAD guide or explore the network on your own.
1. Add the Windows 2019 and 2016 server templates to Ludus
ludus source add ludus-source-bsl --templates win2016-server-x64-template,win2019-server-x64-template
[INFO]  Source 'ludus-source-bsl' installed successfully.
ludus templates build
[INFO]  Template building started - this will take a while. Building 1 template(s) at a time.
# Wait until the templates finish building, you can monitor them with `ludus templates logs -f` or `ludus templates status`
ludus templates list
+----------------------------------------+-------+
|                TEMPLATE                | BUILT |
+----------------------------------------+-------+
| debian-13-x64-server-template          | TRUE  |
| debian-12-x64-server-template          | TRUE  |
| kali-x64-desktop-template              | TRUE  |
| win11-22h2-x64-enterprise-template     | TRUE  |
| win2022-server-x64-template            | TRUE  |
| win2019-server-x64-template            | TRUE  |
| win2016-server-x64-template            | TRUE  |
+----------------------------------------+-------+
2. On the Ludus host, clone and setup the GOAD project
By default, GOAD will use Ludus to create a new users (GOADxxxx) for each new lab. If you want to use a specific name/user:
- Create the user with Ludus
- Set the API key for that user
- Disable impersonation by setting
use_impersonation = noin~/.goad/goad.ini
GOAD will deploy to whatever user you currently "are" (based on exported Ludus API key).
git clone https://github.com/Orange-Cyberdefense/GOAD.git
cd GOAD
sudo apt install python3.11-venv || sudo apt install python3.13-venv
export LUDUS_API_KEY='myapikey'  # put your Ludus admin api key here
./goad.sh -p ludus
GOAD/ludus/local > check
GOAD/ludus/local > set_lab GOAD # GOAD/GOAD-Light/NHA/SCCM
GOAD/ludus/local > install
Now you wait. [WARNING] lines are ok, and some steps may take a long time, don't panic!
This will take a few hours. You'll know it is done when you see:
[*] Lab successfully provisioned in XX:YY:ZZ
If you encounter errors with TASK [groups_domains : synchronizes all domains] or similar, manually remove the 10.ID.10.254 entry from the DNS servers for the host. You can do this via the GUI (Network and Internet -> Change Adaptor Options -> Right-click -> Properties -> Internet Protocol Version 4 (TCP/IPv4) -> Properties) or via Powershell:
# Run this on the failing host
$adapter = Get-WmiObject Win32_NetworkAdapterConfiguration | Where-Object { $_.IPAddress -ne $null }
$dnsServers = $adapter.DNSServerSearchOrder
$newDnsServers = $dnsServers | Where-Object { $_ -notmatch ".*\.254$" }
$adapter.SetDNSServerSearchOrder($newDnsServers)
Optional: Add a Kali VM
ludus --user GOADd126ca range config get > config.yml # Replace GOADd126ca with your GOAD UserID
vim config.yml # Edit the file to add a Kali VM (see below)
ludus --user GOADd126ca range config set -f config.yml
ludus --user GOADd126ca range deploy -t vm-deploy
# Wait for the deployment to finish
ludus --user GOADd126ca range logs -f
# Deploy the Kali VM
ludus --user GOADd126ca range deploy --limit localhost,GOADd126ca-kali
The added Kali VM should look like this at the end of the ludus: block:
  - vm_name: "{{ range_id }}-kali"
    hostname: "{{ range_id }}-kali"
    template: kali-x64-desktop-template
    vlan: 10
    ip_last_octet: 99
    ram_gb: 4
    cpus: 4
    linux: true
    testing:
      snapshot: false
      block_internet: false
3. Snapshot VMs
Take snapshots via the proxmox web UI or SSH run the following ludus command:
ludus --user GOADGOADd126ca snapshot create clean-setup -d "Clean GOAD setup after ansible run"
4. Hack!
With your WireGuard connected on a client machine (your laptop, etc.), access your Kali machine (if you deployed one) at https://10.RANGENUMBER.10.99:8444 using the creds kali:password. Or you can access the lab directly from your client machine with WireGuard connected and attack the 10.RANGENUMBER.10.X subnet.
Follow the GOAD guide or explore the network on your own.