📜 Templates
Templates are the basis of every VM deployed by Ludus. Unlike other solutions, Ludus templates are built from scratch (ISO), and by design don't contain any customization. This allows users to modify base templates into arbitrary VMs during a deploy without having to maintain a library of stale, customized VMs. This focus on infrastructure as code allows Ludus users to create fresh, up to date VMs every deployment.
Ludus supports highly customized templates if that is your preferred option, but all the builtin and included templates deploy the bare minimum to allow Ansible to work (python3/powershell and SSH/WinRM) and a user to connect (RDP, SSH, KasmVNC).
Builtin Templates
Ludus comes with 5 builtin templates:
- debian11
- debian12
- kali
- win11-22h2-x64-enterprise
- win2022-server-x64
Users can add their own templates to the Ludus server with the Ludus CLI.
Additional templates are provided in the templates directory in the root of the git project as examples and have been tested to work with Ludus.
These templates include:
- debian10
- rocky-9-x64-server
- ubuntu-20.04-x64-server
- ubuntu-22.04-x64-server
- win10-21h1-x64-enterprise
- win11-23h2-x64-enterprise
- win2012r2-server-x64
- win2016-server-x64
- win2019-server-x64
- commando-vm (requires ansible role: badsectorlabs.ludus_commandovm)
- flare-vm (requires ansible role: badsectorlabs.ludus_flarevm)
- remnux (requires ansible role: badsectorlabs.ludus_remnux)
Adding Templates to Ludus
To add a template to Ludus, use the Ludus CLI to upload the template directory to the server with ludus templates add -d <template directory>.
local:~$ git clone https://gitlab.com/badsectorlabs/ludus
local:~$ cd ludus/templates
local:~$ ls -1
debian10
manual-setup-required
rocky-9-x64-server
ubuntu-22.04-x64-server
win10-21h1-x64-enterprise
win11-23h2-x64-enterprise
win2012r2-server-x64
win2022-server-x64
local:~$ ludus templates add -d debian10
[INFO]  Successfully added template
local:~$ ludus templates list
+----------------------------------------+-------+
|                TEMPLATE                | BUILT |
+----------------------------------------+-------+
| debian-11-x64-server-template          | TRUE  |
| debian-12-x64-server-template          | TRUE  |
| kali-x64-desktop-template              | TRUE  |
| win11-22h2-x64-enterprise-template     | TRUE  |
| win2016-server-x64-template            | TRUE  |
| win2019-server-x64-template            | TRUE  |
| debian-10-x64-server-template          | FALSE |
| debian-12-x64-server-ludus-ci-template | TRUE  |
+----------------------------------------+-------+
local:~$ ludus templates build -n debian-10-x64-server-template
[INFO]  Template building started
local:~$ ludus templates logs -f
2024/01/17 18:19:11 [INFO] Packer version: 1.9.4 [go1.20.7 linux amd64]
2024/01/17 18:19:11 [TRACE] discovering plugins in /opt/ludus/resources/packer/plugins
2024/01/17 18:19:11 [INFO] Discovered potential plugin: ansible = /opt/ludus/resources/packer/plugins/github.com/hashicorp/ansible/packer-plugin-ansible_v1.1.1_x5.0_linux_amd64
...
Creating Your Own Templates for Ludus
Templates in Ludus must contain certain variables to function correctly. To create a new template, copy an existing working template and modify it as necessary. Templates for different Linux flavors and Windows are provided. While macOS VMs are supported by Ludus, their automated templating is not (see Non-Automated OS Template Builds).
Examples of community-contributed templates:
Every Ludus template is a packer file (.pkr.hcl and .pkr.json supported, but .pkr.hcl preferred), and any supporting files (resources, scripts, etc.).
The template file MUST include the .pkr. portion of the file name to be recognized as valid by Ludus.
Ludus template packer files must include the following variables, which are set dynamically by Ludus during build time:
# This block has to be in each file or packer won't be able to use the variables
variable "proxmox_url" {
  type = string
}
variable "proxmox_host" {
  type = string
}
variable "proxmox_username" {
  type = string
}
variable "proxmox_password" {
  type      = string
  sensitive = true
}
variable "proxmox_storage_pool" {
  type = string
}
variable "proxmox_storage_format" {
  type = string
}
variable "proxmox_skip_tls_verify" {
  type = bool
}
variable "proxmox_pool" {
  type = string
}
variable "iso_storage_pool" {
  type = string
}
variable "ansible_home" {
  type = string
}
variable "ludus_nat_interface" {
  type = string
}
####
These variables are to be used in the packer configuration to ensure that the template is built correctly depending on how the Ludus server is configured (i.e. with a custom ZFS storage pool).
The template name displayed by Ludus is extracted with the following regex: (?m)[^"]*?-template. Therefore, be sure to have a string in your packer file that includes -template that will be used as the template name. Typically this is the vm_name variable.
It is the Ludus convention to use localuser:password as the user account for templates unless there is a reason not to (i.e. kali).
Performance Options
Disk
For best performance of VMs in Proxmox, it is recommended to set the following options:
  scsi_controller = "virtio-scsi-single" # Allows the use of io_thread for the disk
  disks {
    disk_size         = "${var.vm_disk_size}"
    format            = "${var.proxmox_storage_format}"
    storage_pool      = "${var.proxmox_storage_pool}"
    type              = "virtio"
    discard           = true # allows Proxmox to reclaim space when files are deleted
    io_thread         = true
  }
IOThreads deliver performance gains exceeding 15% at low queue depth. The performance benefits of an IOThread (for a single storage device) appear to diminish with increasing queue depth. However, in most cases, the benefits outweigh any potential consequences.
Network
For network hardware, virtio is recommended if the guest supports it (see any Windows template provided with Ludus for how to automatically install the virtio drivers during install):
  network_adapters {
    bridge = "${var.ludus_nat_interface}"
    model  = "virtio"
  }
While the e1000 adaptor is an emulated Intel network card, the virtio adaptor is paravirtualized and much faster.
CPU
Setting cpu_type = "host" in your template will essentially "pass through" the CPU without any compatibility to migrate between hosts with different CPUs.
If you don’t care about live migration or have a homogeneous cluster where all nodes have the same CPU and same microcode version, set the CPU type to host, as in theory this will give your guests maximum performance.
Non-Automated OS Template Builds
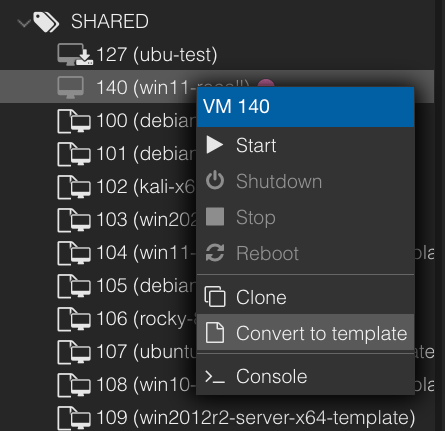
Templates must be in the SHARED pool to be accessible to all Ludus users
Requirements
Ludus uses remote management (WinRM and Powershell for windows, SSH and python3 for Linux/macOS) to do all the configuration of machines deployed from templates. Thus templates need to have a form of remote management (WinRM/SSH, with proper credentials) enabled and anything ansible needs (powershell for windows, python3 for linux/macOS) installed. Additionally, based on how ludus works, it expects templates to boot with DHCP enabled to get an IP to perform their initial configuration (i.e. getting a static IP set). If you have all those components set up in a VM you built by hand, and you power it off and convert it to a template, Ludus should be able to use that template in ranges without issue.
Windows:
- Qemu Guest Agent installed
- WinRM must be enabled and available over HTTPS
- Powershell must be installed
- DCHP must be enabled
localuser:passwordmust be a local admin account
Linux/macOS:
- Qemu Guest Agent installed
- SSH must be enabled
- python3 must be installed
- sudo must be installed
- DHCP must be enabled
localuser:passwordmust be an account that has sudo permissions for all commands (debian:debianon debian for legacy reasons, see group_vars for all expected credentials)
Converting to Template
To convert a VM to a template, power it off and in the Proxmox web UI, right click the VM, then click Convert to template.

Uploading ISOs
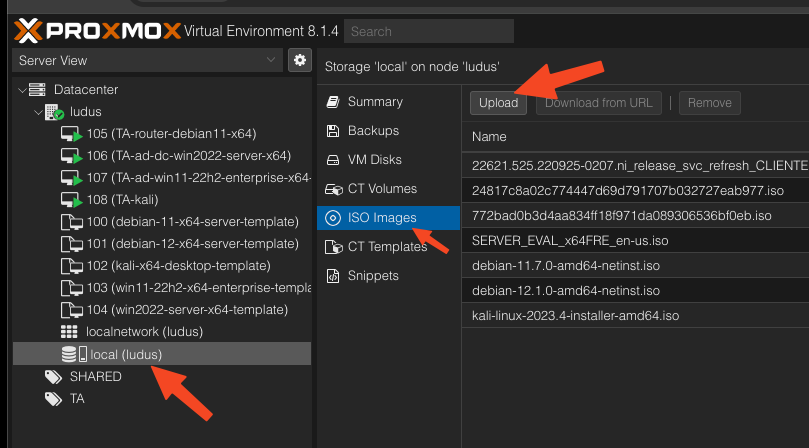
To manually upload ISO files, click the datastore, then ISO Images, then Upload.

Windows 7
If you wish to use VirtIO devices during install, follow this guide.
- Download the Windows 7 ISO (md5:
1d0d239a252cb53e466d39e752b17c28) - Create a VM with your desired hardware options
- Boot the VM and install Windows 7
- Install an old version of the virtio drivers manually
- Install Service Pack 1 from here
- Install .NET 4.5 from here
- Install Windows Management Framework 5.1 from here and reboot
- Copy the
setup-for-ansible.ps1script to the host and runpowershell -exec bypass .\setup-for-ansible.ps1 - Convert to template
Windows 2008 R2 x64
- Download the Windows 2008 R2 x64 ISO (sha1:
a548d6743129f2a02c907d2758773a1f6bb1bcd7) - Create a VM with your desired hardware options
- Boot the VM and install Windows 2008 R2
- Install an old version of the virtio drivers manually
- Install Firefox because IE8 (yes 8) can't load Microsoft sites
- Install SP1 from here
- Install KB2677070-x64.msu from here
- Download and install the MicrosoftRootCertificateAuthority2011.cer into Trusted Root Certification Authorities (guide) from here
- Set the date to 2013-10-10
- Download and install the .Net 4.5.2 offline installer from here
- Reset the date to current date
- Install Windows Management Framework 5.1 from here and reboot
- Copy the
setup-for-ansible.ps1script to the host and runpowershell -exec bypass .\setup-for-ansible.ps1 - Convert to template
macOS
- Follow this
- Run
python3in a terminal in the VM to install python3 - Optionally, install Xcode or other tools
- Convert to template
The VM name MUST include the string macos to be properly identified as macOS by the dynamic inventory script since macOS doesn't have QEMU agent support.