Install Ludus
Ludus will be installed directly on the host. Docker should not be installed on the host as it interferes with networking.
Ludus is not supported on hosts that are connected to the network via WiFi. Please connect via ethernet.
Ludus can only be installed on a host that meets the following requirements:
- x86_64 (aka amd64 aka 64-bit "Intel") CPU with a Passmark score > 6,000
- Debian 12/13 or Proxmox 8/9 (If Proxmox, see this page for details)
- Supports virtualization - vmx or svm in /proc/cpuinfo (nested virtualization is supported, but has a performance penalty)
- Has at least 32 GB of RAM
- Has at least 200 GB of disk space (fast NVMe recommended)
- Root access
- Internet access (not via WiFi). Note: Bonded nics or other advanced networking is not supported. If you use these, you will need to console in and fix the network after install (edit
/etc/network/interfaces), as Ludus assumes you have a single, standard interface.
Machines with lower specs than listed above may work, but are not tested/supported.
For Debian 13, use the Debian 13 netinst ISO (scroll down to debian-13.x.x-amd64-netinst.iso).
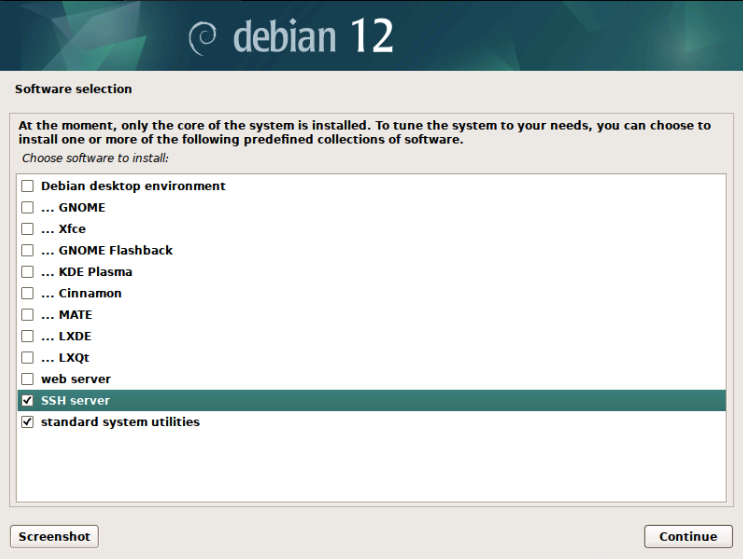
At the screen below during install, uncheck Debian desktop environment and check SSH server.
To install ludus, use the installer script on a Debian machine as shown below. It will extract files into /opt/ludus and walk through the configuration values during install.
Ludus binaries are built in CI, but you can always build them from source yourself.
ssh user@debian

su -
# Enter root password to elevate to root, then install the prerequisites
apt update && apt install curl sudo ca-certificates python-debian

# All-in-one command
curl --proto '=https' --tlsv1.2 -sSf https://ludus.cloud/install-beta | bash

# If you want to check out the install script
curl https://ludus.cloud/install-beta > install.sh
cat install.sh
chmod +x install.sh
./install.sh
The install.sh script will install the ludus client, and optionally shell completions, and then prompt to install the server.
Follow the interactive installer. If you are unsure of any option, just accept the default value. The installer will start and reboot the machine.
After the reboot, the install will continue automatically. To monitor its progress, ssh into
the machine, elevate to root, and run ludus-install-status.

Customizing the install
In advanced setups /opt/ludus/config.yml can be modified after install to accommodate different storage pools,
ZFS, etc.
To have the Ludus server processes pick up any changes to the config file, you must restart the Ludus services with:
systemctl restart ludus
systemctl restart ludus-admin
---
proxmox_node: ludus               # The proxmox node/hostname for this machine
proxmox_invalid_cert: true        # Disables certificate checking when using the Proxmox API (default true because of the self signed certificates)
proxmox_interface: ens18          # The interface this machine uses to communicate to the internet
proxmox_local_ip: 203.0.113.136   # The IP address for this interface (will be set statically)
proxmox_public_ip: 203.0.113.136  # The public IP address to reach this machine (for use in cloud/NAT environments)
proxmox_gateway: 203.0.113.254    # The gateway this machine uses to reach the internet
proxmox_netmask: 255.255.255.0    # The netmask for the proxmox_interface
proxmox_vm_storage_pool: local    # The name of the VM storage pool - can be changed after install for custom pools
proxmox_vm_storage_format: qcow2  # The VM storage format - can be changed after install (i.e. raw)
proxmox_iso_storage_pool: local   # The storage pool used to store ISOs as they are downloaded for templates - can be changed after install
ludus_nat_interface: ludus        # The name of the interface Ludus will create on the proxmox host that Ludus will use as the "WAN" for range routers
prevent_user_ansible_add: false   # Set this to true to prevent non-admin users from adding Ansible roles or collections to the server
license_key: community            # Set this to your license key if you have one, or leave as community for community edition
expose_admin_port: false          # Set this to true to expose the admin API globally
reserved_range_numbers:           # An array of range numbers that should not be used by users (see networking docs for more info), example: [1,2,3,4]
data_directory: /opt/ludus/db     # The directory to store the ludus database and some ludus data
database_encryption_key: abc12... # The key used to encrypt data in the database. DO NOT CHANGE AFTER INSTALL
wireguard_port: 51820             # The port WireGuard listens on
cluster_mode: false               # Override cluster detection and for cluster mode on (true) or off (false)
sdn_zone: ludus                   # The SDN Zone name Ludus will use for the `ludusnat` VNet and range VNets in cluster mode
vxlan_tag_base: 0                 # The number that will be added to the VXLAN tag used for each range's VNet (vxlan_tag_base + range_number = Range VNet VXLAN tag)